So this week Bike Stop is going to give you advice on how to clean your helmet, I will wait for all the related jokes and the laughter to die down... By the end of this blog you will know how to make your helmet look completely new after a long summer of riding!
You will need the following items before we begin..
Helmet & Visor Cleaner
Soft Toothbrush
Anti Fog Solution (Optional)
Microfibre Cloth
Silicon Grease
Helmet Polish
Baby Shampoo
Or you can get this handy Helmet Care Kit, which provides most of this stuff.
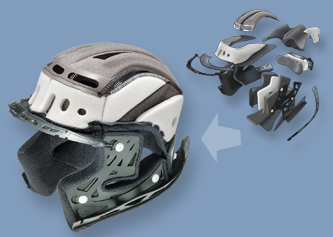
1 - Remove interior padding
The first step is to remove the interior padding of your helmet (If you can), on most helmets the padding will be held on by poppers. You should be able to remove the 2 cheek pads and the centre pad. Place these to one side and try to remember
2- Dislodging grime on the helmet
A good method I recently learned about was placing a warm damp towel over the top of the helmet for a few minutes. If you are anything like me and let grime and dead insects build up on your helmet, this is a great method that will make your life easier when you come to cleaning the helmet later.
3- Washing the padding
While leaving the towel over your helmet, grab the interior padding you removed and soak them in some warm water and baby shampoo. You might be surprised by how dirty the water gets! Or it could just be me... Massage all the linings and when you are happy remove the pads and leave them to dry for between 1/2 a day to a full day.
4- Remove and Clean Visor
Carefully remove your visor, the method for removing the visor tends to be different for most helmet brands, so make sure you consult your owners manual. Use the visor cleaning spray and microfiber cloth to get rid of the grime on the visor, make sure you don't rub too hard or use anything other than a soft microfiber cloth otherwise you may scratch your visor. If the build up of grime is really bad, soak the visor in some warm soapy water then try again. Make sure you let the visor dry naturally. Once the visor is dry you can apply some anti fog solution if you don't already have a pinlock insert.

5 - Clean Helmet Outer Shell
Use the microfiber cloth and helmet cleaner to get rid of the remaining dirt on the helmet. Most of this should have been dislodged easier on in the process, so should come away easily. Use the toothbrush to get into any areas that are hard to reach with a cloth, such as air vents. Once you are happy the shell is clean, using a different microfiber cloth apply some helmet polish and your helmet should be looking almost like new!
6- Apply Silicon Grease
Before reattaching the visor, apply some silicon grease to the visor mechanism, this should make it easier for you to open and close your visor.

7 - Lastly Reassembly
When your helmet, visor and padding is clean and dry there is only one thing left to do. Stick it all back together again! I find it easier to insert the interior padding first, before carefully reattaching the visor. Make sure your visor is on correctly and can freely move up and down without getting caught on anything.
I hope these tips have helped some of you, if you have any questions, don't hesitate to contact us! Visit us at Bike Stop, or call us on +44 (0)1438 317038.